Today I should be at Cottonpicker's all day if you are in the Chardon area and have any questions about long arm machine quilting. I can talk over the different patterns and options with you, look at a quilt for you and give a quote or just chat in general!
Don't forget that even if you have any questions at all and may not be in the area but would like some answers before handing over your quilt to someone to be completed, I'm all ears. Let me know what you would like more information on and I'll try to help you out.
I'm planning on doing some tutorials on how the long arm works, how the quilts are loaded, quilted and unloaded and different things to keep in mind that can either help or hinder in this process.
Hope to see many people today, I know I haven't been at the shop that much lately, but this whole job thing keeps getting in the way of my fun... But I'm hoping that will change in the future too :)
I'll be showing more pictures of recent quilts I've long armed here too with some newer designs for me. It's so exciting to try something new! Back with more soon!

6.23.2012
6.22.2012
Machine Quilting: Double Take
My Nana made one of these quilts and helped to make the other. The lighter one is for her Pastor's sister as a wedding present and the Pastor's kids helped make the top! The darker quilt is a present for the mother of the bride, how neat is that?!
 I think this will make a wonderful wedding present!
 Nana wanted the two quilts quilted differently, so on the first I did these viney swirls. I love doing this design and it looks so elegant, so that's what I call it - Elegant.
 The next quilt was done in blues and tans and I love the way it looks. I quilted this one sideways since it was easier with the backing she chose.
 I'm not sure if you can see it here, but Nana LOVES variegated threads so this thread is a variety of blues. It looked really sharp in the quilting. The first quilt was quilted with a variegated tan thread.
 The fireside backing (from Moda, love this stuff!) really shows off the quilting! These are free motion peacock feathers.
 This quilt looks so striking, I think she did a great job on it. Thanks, Nana!


6.17.2012
Happy Father's Day!!!
Today Ben and I spent some quality time with our nephew whose father kinda isn't available right now. Shawn is almost 9 years old and a really good kid.
We had other plans but storms rolling through the area squashed those so we went bowling! It was fun and I haven't laughed as much as I did today in a while. But can you blame me when you're bowling with these two? There's just a small difference in their techniques (okay, a big difference) and it made me laugh.
Shawn's bowling style is well, unique to say the least. But you know what? He beat me in the second game. The throws that didn't immediately go in the gutter were pretty awesome down the lane.
Ben however used to be on a bowling league back in the day before we were together. In the ten plus years we've been together we've only been bowling three times including today, but he's still got it! This wasn't the most dramatic hook throw he made, but it's the only one I got on video. He even threw out the idea of the two of us joining a league... We'll see.
Hope you all had a great Father's Day! I had so much fun today, maybe fishing will be just as entertaining with Shawn when we actually get to go.
We had other plans but storms rolling through the area squashed those so we went bowling! It was fun and I haven't laughed as much as I did today in a while. But can you blame me when you're bowling with these two? There's just a small difference in their techniques (okay, a big difference) and it made me laugh.
Hope you all had a great Father's Day! I had so much fun today, maybe fishing will be just as entertaining with Shawn when we actually get to go.
6.15.2012
Machine Quilting: Grinch Quilt
Linda gave me this top to quilt and asked for a design like Waterworld (a pantograph pattern) or something freehand like it. I took one look at the quilt and new what had to be done!
 I love quilting swirls, they add so much to a quilt! These swirls come to a point which makes them fit in with the Suess theme.
 Linda did a wonderful job on the quilt. I love the fabrics.
 On a quilt like this that has extremely contrasting fabrics it may be hard choosing a thread color. I quilted this in a light green that stood out just enough to show the quilting, but didn't stand out so much that it's the only thing you'll notice.
Thank you, Linda, for letting me quilt this for you! It was fun and got me thinking about the quilts I should start for Christmas projects. They might actually get done this year... if I start now...


Thank you, Linda, for letting me quilt this for you! It was fun and got me thinking about the quilts I should start for Christmas projects. They might actually get done this year... if I start now...
6.14.2012
Isn't it Ironic???
Don't ya think? (So sorry, my Hubbin is absolutely addicted to the 90's on 9 station on our Sirius radio on the TV and God forbid if I change the channel. Another funny story about that, but keep reading for that one)
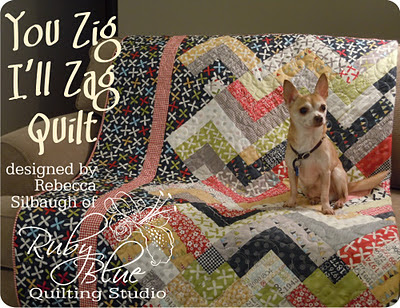
So, many of you who follow my blog or found me through the Moda Bake Shop have seen pictures of my crazy dogs. Like this one from my last Bake Shop recipe (click here for the recipe if you haven't checked it out already)
 Well, here's the ironic part (which I was completely clueless until Hubbin pointed it out, but alas). So let me set the scene for you...
It's Sunday morning. I'm in my pajamas still, I have no motivation to go anywhere or do anything. My hair is in somewhat in the ponytail I went to bed in and I haven't looked in the mirror because I know I look like I've been through a major session of electroshock therapy. Ben and I are talking when I notice Paco acting strange and this mess of goo coming from his mouth. He's not sick yet, but it might be coming real soon.
So I do what everyother dog mommy does and grab my baby and run outside. Leash? No! The dog's going to be sick, how far could he run? (insert cheesy fake laughing here) We've done this before. Paco is a Chihuahua which when translated equals something to the effect of "eats anything that will fit in mouth and decide if it was a good idea or not later". He gets sick occasionally, we go outside, he does his thing, we go inside, no leash.
Well, I took Paco out. He did something, but no sickness. Then he ran to the far side yard and did some "business". I'm thinking maybe that's all it was and now he'll feel better. Well, obviously it must've done something because I called for him to go back inside and he ran right to the door.
Now at this point I'm feeling pretty damn good. I have an elderly partially blind partially deaf (or selective on both when he wants to be) dog that has the memory span of a goldfish off leash and he ran right to the door. Meanwhile I still look like death warmed over I'm sure, but I'm awesome, right? I open the door, the dog is inches away...
That's when the little **** decided to bolt towards the street. Luckily we live on a not so busy side street, but regardless a 5 lb. Chihuahua is no match for a car. So then I ran (kinda) barefoot across the gravel driveway (ouch!) after him. He then ran away from the road and into the yard, which would have been nice but it was the neighbor's yard! I chased, he ran, I chased some more, he ditched me somewhere in the chase around the neighbor's cars and then he bolted again - DOWN THE ROAD!!!
At this point all I can think of is he's running away. How am I going to tell Ben? Speaking of, where is Ben? What if he gets hit by a car? How will I explain that? What if I don't get him back? (I am definitely my own worst enemy, or my mind is)
I finally catch up to Paco and somehow I am able to grab him at the corner of our road and the crossroad. I don't know what made him hesitate. But I got him! Yay!
That's when the realization that I am in my pajamas looking like hell (to put it bluntly) and I just ran down the street barefoot. It's not paved and it's not gravel, but it's that lovely chip & seal crap that smells and it's not so nice on the feet. Not only do my feet start to hurt almost instantaneously at this realization but I also had a few other things come to mind:
1. Who did I just give an entertaining show to this early in the morning? (Oh goodness!)
2. I'm still barefoot and now have to walk back to the house (which hurt worse because now I'm aware of everything I step on, no more adrenaline rush)
3. I am so out of shape!
4. How do I tell Ben this?
So I go inside and spill the news to Ben. I'm a little ticked at the dog and not sure how to react to it. Life goes on...
Then a little later that morning I was working on the computer and somehow the picture above came onto my screen. Ben is standing behind me and starts laughing like crazy. Still a bit ticked, I ask what is so funny.
He points to the picture and tells me that I couldn't have named my quilt better, he zigged and you zagged alright. Paco was free for just a few minutes, but he was free!
I know Ben was trying to make light of the situation, and I have to say it worked. Thought you all might find it interesting. Anyone else have crazy mornings like mine that give you a nice reality check?
p.s. Oh, and back to the Ben & 90's on 9 station. So it's the 90's on 9 station. A song comes on, I can't remember which one, but Ben says, "Wow, this is an old one!"
It's the 90's on 9 station. All the songs played are from the 90's. I could understand if it was a random radio station, but come on! I thought it was funny, I still can't believe those words came out of his mouth. hehehehe
So, many of you who follow my blog or found me through the Moda Bake Shop have seen pictures of my crazy dogs. Like this one from my last Bake Shop recipe (click here for the recipe if you haven't checked it out already)

It's Sunday morning. I'm in my pajamas still, I have no motivation to go anywhere or do anything. My hair is in somewhat in the ponytail I went to bed in and I haven't looked in the mirror because I know I look like I've been through a major session of electroshock therapy. Ben and I are talking when I notice Paco acting strange and this mess of goo coming from his mouth. He's not sick yet, but it might be coming real soon.
So I do what everyother dog mommy does and grab my baby and run outside. Leash? No! The dog's going to be sick, how far could he run? (insert cheesy fake laughing here) We've done this before. Paco is a Chihuahua which when translated equals something to the effect of "eats anything that will fit in mouth and decide if it was a good idea or not later". He gets sick occasionally, we go outside, he does his thing, we go inside, no leash.
Well, I took Paco out. He did something, but no sickness. Then he ran to the far side yard and did some "business". I'm thinking maybe that's all it was and now he'll feel better. Well, obviously it must've done something because I called for him to go back inside and he ran right to the door.
Now at this point I'm feeling pretty damn good. I have an elderly partially blind partially deaf (or selective on both when he wants to be) dog that has the memory span of a goldfish off leash and he ran right to the door. Meanwhile I still look like death warmed over I'm sure, but I'm awesome, right? I open the door, the dog is inches away...
That's when the little **** decided to bolt towards the street. Luckily we live on a not so busy side street, but regardless a 5 lb. Chihuahua is no match for a car. So then I ran (kinda) barefoot across the gravel driveway (ouch!) after him. He then ran away from the road and into the yard, which would have been nice but it was the neighbor's yard! I chased, he ran, I chased some more, he ditched me somewhere in the chase around the neighbor's cars and then he bolted again - DOWN THE ROAD!!!
At this point all I can think of is he's running away. How am I going to tell Ben? Speaking of, where is Ben? What if he gets hit by a car? How will I explain that? What if I don't get him back? (I am definitely my own worst enemy, or my mind is)
I finally catch up to Paco and somehow I am able to grab him at the corner of our road and the crossroad. I don't know what made him hesitate. But I got him! Yay!
That's when the realization that I am in my pajamas looking like hell (to put it bluntly) and I just ran down the street barefoot. It's not paved and it's not gravel, but it's that lovely chip & seal crap that smells and it's not so nice on the feet. Not only do my feet start to hurt almost instantaneously at this realization but I also had a few other things come to mind:
1. Who did I just give an entertaining show to this early in the morning? (Oh goodness!)
2. I'm still barefoot and now have to walk back to the house (which hurt worse because now I'm aware of everything I step on, no more adrenaline rush)
3. I am so out of shape!
4. How do I tell Ben this?
So I go inside and spill the news to Ben. I'm a little ticked at the dog and not sure how to react to it. Life goes on...
Then a little later that morning I was working on the computer and somehow the picture above came onto my screen. Ben is standing behind me and starts laughing like crazy. Still a bit ticked, I ask what is so funny.
He points to the picture and tells me that I couldn't have named my quilt better, he zigged and you zagged alright. Paco was free for just a few minutes, but he was free!
I know Ben was trying to make light of the situation, and I have to say it worked. Thought you all might find it interesting. Anyone else have crazy mornings like mine that give you a nice reality check?
p.s. Oh, and back to the Ben & 90's on 9 station. So it's the 90's on 9 station. A song comes on, I can't remember which one, but Ben says, "Wow, this is an old one!"
It's the 90's on 9 station. All the songs played are from the 90's. I could understand if it was a random radio station, but come on! I thought it was funny, I still can't believe those words came out of his mouth. hehehehe
6.13.2012
Back to Basics - Irons

So, after my recent purchase of an iron, it got me thinking about all the options you should think about when selecting an iron yourself. So how about we check out all that irons have to offer!

I honestly don't have much of an opinion between the two. They both seem to work the same to me.


The new iron has separate controls, one for steam...


One of the last features that you should also consider when purchasing an iron is the weight of it. If it's too heavy and it makes your wrist want to fall off after a few minutes of pressing, it's not going to work. Most stores have a display available where you can actually hold and inspect the irons. Weight is also an important feature if you have any injuries or issues like carpal tunnel, rotator cuff injuries, tennis elbow, etc.
Most important aspect to consider when purchasing an iron is the cost. Both of my irons cost less than $20 and the first one lasted me about 5 years of pretty heavy abuse. Just because something is shiny and expensive doesn't mean that it's better than the other options on the market. I know far too many people that have spent way too much on an iron to only have it die on them a few months later... I know you get what you pay for typically, but not from what I've seen in the iron market.
The last bit of advice I can give you is to do some research before you buy anything and look up other customer reviews on the products you're thinking about buying. It's typically unbiased opinions that might bring to light an issue you might not have considered.
I'll be back soon with the struggle of steam v. no steam and ironing v. pressing.
So what kind of iron do you own and are there any features you like on your iron I didn't list about mine? Any troubles you've had you would like to share?
6.11.2012
Shipshewana 2012 (the duo)/Trunk Show
So, last week Mom and I headed over to Shipshewana to work with Moda at the Regional Fabric Show. We do this a few times a year and this was our second time this year out to Indiana.
 The day started out a bit sunny... as you can see. Poor Mark opted to switch places and sit where the customers normally do so they weren't blind by the time they left...
 This was the beginnings of the Ruby Blue/ Moda area. Doesn't it look cozy?
 We had all sorts of quilt in the booth this time around. More than usual, that's for sue. Most of them were straight from Market.
 We also had a display of the latest Sewline products and Ruby Blue Patterns.
 I got to show off some of the latest Moda Bake Shop quilts and the Alphabet Stitcheries.
 Here's how the back of the booth looked. There's so many good lines this time around (as usual) and some new designers too. I love them all, don't you?
 And, Mark had the newest Bella Solids card which now includes 220 colors! 220! That's crazy, but it also makes life so much easier! The greatest part is there's always something to match the Moda lines... Easy Peasy!
Oh, and on a side note, if any of you are planning on attending the Shipshewana Quilt Festival here in another week or so be sure to stop by Yoder's Department Store. Not only are they the hub basically for all things Quilt Festival related (and the fact they expanded the store and it's even bigger now than it was), but - they have some of my quilts and will be doing a trunk show during Quilt Festival!!! I'm so excited and cannot thank Dawn enough for this opportunity!
Let me know if you're going to Quilt Festival, I'd love to hear what you think. Unfortunately I cannot attend this year, but I will be there in spirit.
6.10.2012
Machine Quilting: The Purple Monster
I met this dear lady, Carol, through the quilt shop a few years ago. She brought me this quilt to machine quilt for her dubbed "The Purple Monster". You'll see why:

 The quilt is a whopping 104" x 115"! And full of purples galore!
 You can kinda see some of the quilting here. Carol asked for an all over leaf pattern, so I chose one that worked well with the scale of the quilt.
 I really like how the various colors and shades look with that pop of tan setting off each block.
 The back was just a plain muslin, but it really shows off the detail of the quilting.
Thanks, Carol! This was a joy to quilt! Now have fun with all that binding... hehehehe


Thanks, Carol! This was a joy to quilt! Now have fun with all that binding... hehehehe
6.01.2012
You Zig I'll Zag LARGE
So, yesterday I had this wonderful gal, Jesilyn, contact me about how much she would need to make my MBS tutorial You Zig I'll Zag quilt into a king size. (Hi Jesilyn!)
I did some quick figuring and this might not be quite King, but it's dang close and depending on the thickness of the mattress you're looking to cover, it just might do it.
So how about we revisit this pattern that you can find on the Moda Bake Shop lap size and here on the blog (under tutorials) mini size?
 Okay so, to make the same pattern into a 97" square quilt, you'll need:
2 Layer Cakes plus 1 additional 10" square
Side Setting Fabrics - 1 1/4 yards
Border 1 - 3/4 yard
Border 2 - 2 1/3 yards (if pieced) or 3 yards (if tearing)
Backing - 9 yards (3 - 3 yard pieces)
Binding - 1 yard
 (You'll still need to consult the Moda Bake Shop recipe for the full instructions, but here's the things you'll need to change to make the larger size)
From the 2 Layer Cakes and extra square, follow the cutting and piecing instructions to create 85 blocks.
Lay out the blocks in a 7 x 7 on point setting.
From the side setting fabric, cut 2 strips 13" wide. From these strips cut 6 squares 13" x 13". Cut each square in half twice diagonally. Also cut one 7" strip into 2 squares 7" x 7", cut these in half once diagonally for the corners.
Lay out the side setting pieces and blocks and sew them together in rows, then sew the rows together. The quilt center should measure around 79" square.
From the first border fabric, cut 9 strips 2 1/2" wide. Add these to the quilt, sides first. Then add the top & bottom borders.
Cut the second border fabric into 10 strips 7 1/2" wide (if piecing) or tear 4 strips 7 1/2" wide. Add these to the quilt. It should now measure 97" square.
Lastly, the binding fabric should be cut into 11 strips 2 1/4" wide or whatever width you prefer.
And there you have it! Another size option to the You Zig I'll Zag Quilt.
So which of the three sizes are you more likely to make?
Oh, and by the way, these blocks go together in a jif! I personally haven't made this in the large size, but I can assure you it'd go together super quick. I might just have to make one of these for myself! Now which fabrics to use...
I did some quick figuring and this might not be quite King, but it's dang close and depending on the thickness of the mattress you're looking to cover, it just might do it.
So how about we revisit this pattern that you can find on the Moda Bake Shop lap size and here on the blog (under tutorials) mini size?

2 Layer Cakes plus 1 additional 10" square
Side Setting Fabrics - 1 1/4 yards
Border 1 - 3/4 yard
Border 2 - 2 1/3 yards (if pieced) or 3 yards (if tearing)
Backing - 9 yards (3 - 3 yard pieces)
Binding - 1 yard

From the 2 Layer Cakes and extra square, follow the cutting and piecing instructions to create 85 blocks.
Lay out the blocks in a 7 x 7 on point setting.
From the side setting fabric, cut 2 strips 13" wide. From these strips cut 6 squares 13" x 13". Cut each square in half twice diagonally. Also cut one 7" strip into 2 squares 7" x 7", cut these in half once diagonally for the corners.
Lay out the side setting pieces and blocks and sew them together in rows, then sew the rows together. The quilt center should measure around 79" square.
From the first border fabric, cut 9 strips 2 1/2" wide. Add these to the quilt, sides first. Then add the top & bottom borders.
Cut the second border fabric into 10 strips 7 1/2" wide (if piecing) or tear 4 strips 7 1/2" wide. Add these to the quilt. It should now measure 97" square.
Lastly, the binding fabric should be cut into 11 strips 2 1/4" wide or whatever width you prefer.
And there you have it! Another size option to the You Zig I'll Zag Quilt.
So which of the three sizes are you more likely to make?
Oh, and by the way, these blocks go together in a jif! I personally haven't made this in the large size, but I can assure you it'd go together super quick. I might just have to make one of these for myself! Now which fabrics to use...
Subscribe to:
Posts (Atom)