1.31.2013

Machine Quilting: Alaskan Adventure!

I don't think there is any region that specifically creates memory quilts like the Alaskan frontier. Darlene and her friend both picked up quilt kits on their travels up north and asked me to quilt them up.
 This first quilt is actually loaded onto the machine sideways.
 With the floral prints, you really can't see the quilting, but I was asked to do something a little special in the "sashing".
I mirrored that same detail in the small border which really tied in the swirls. If you look closely, you can see the floral prints are quilted, it just really hard to see. 
 The next quilt took a panel and made this amazing photo album complete with the Northern Lights as the border.
 Each panel got just enough quilting to hold it in place with different swirls in each other area.
 The different swirls make the whole quilt work together while making each area distinct.
 The last quilt was an Alaskan scene through a window pane.
 The two border fabrics were each quilted differently, while the panel was then quilted just enough filling in and around the scenes in each frame.
Do you have a memory quilt from anywhere you've traveled? I can say I do not, but then again I haven't been privileged enough to find a fabric shop while on vacation.

Thanks ladies for letting me quilt these for you! Seeing these quilts makes me want to hop on a plane to hop on a boat and see Alaska again. Maybe once it's warmer, like ALOT warmer...

1.29.2013

Sounds good to me!

So, did you listen to the American Patchwork & Quilting Radio show yesterday? If you did, great and thank you sooooo much! If not, here's the link you can go to http://www.allpeoplequilt.com/radio/index.html, I'm the first segment of the 1/28/13 show.

I have to thank Pat Sloan again for this opportunity. It was so nice to chat with her. I just stayed home yesterday and did some sewing of my own which let me finish the rest of the rings for my Bali Wedding Star!
So the opposite of these rings are now complete. Once again, I think this project is going to get stashed away for just a bit to work on other projects for upcoming shows and some new patterns!

Back with more quilting updates soon!

1.28.2013

On the Radio!

Remember today at 4 p.m. EST you can listen to the American Patchwork & Quilting Radio program to hear me chatting with Pat Sloan about my new book!
Can't get to your computer to listen to the podcast at 4? No problem! You can listen at your convenience by heading to http://www.allpeoplequilt.com/radio/index.html

You can go through the list of several interviews Pat has done and listen until your heart's content.

Cross your fingers the dogs are quiet, no crazy people decide to knock at the door and I don't sound like a dork! I'm so excited to talk to Pat, this should be interesting. Wish me luck!

1.27.2013

Snow Days!

So if you didn't already know, I happen to live in the wonderful area of Northeast Ohio called the "Snowbelt". Actually now I live in the secondary snowbelt, but my long-arm machine is still smack-dab in the heart of it all.

We've been getting small amounts of snow just about every day for the last few weeks, but this past week has been especially cold. When it's this cold the snow is super fine and powdery which makes beautiful winter scenes like this:
This is the view from my quilting room. The best part about really cold winters are the absolutely gorgeous blue skies that pop up between snow storms. (Not fifteen minutes after I took this photo the snow moved in and the sky was a whitish gray which isn't so pretty) Oh, and if you noticed, that is a large flower pot on it's side down at the bottom of the picture...

Just a little ways away from the flower pot on the patio is the bench absolutely covered in snow. We got this snow during the past week but not all at once. The snow so far this year has been a few inches here, 6 inches there, a little more overnight, which isn't soooo bad, but it does add up. 
 So what do you do when you live in the country with almost a 400' long driveway in the snowbelt? You get an 8' PTO driven snow thrower for your tractor. This is my little brother clearing the drive.
 As I mentioned, this snow is so powdery that it basically dissipates rather than being thrown very far.
 And all the while, the puppies (who are older, not young, but puppies at heart) love to look out the front door and take in the view. If you open the front door, they'll sit like this all day.
 Here you've got Hershey, Tucker and Abby. I love when they do this, but I haven't had the chance until now to get good pictures of it.
 And there has to be a ham in every crowd, meet Abby Sue. The other two could care less about a camera or they'll hide. Abby on the other hand wants to be front and center. I think she was a model in a past life.
 One of the other good things about snowy days like this (yes, there are good things about snow!) Are the beautiful sunsets we can get. This one was much prettier in person, but occasionally this time of year we get skies with shades of oranges, reds and purples that will take your breath away.

So that's the snow for the last week, however like any season in Ohio next week is supposed to be completely different. Last week on Tuesday the high was 8 degrees. This week the high on Tuesday is supposed to be 52 degrees. And then two days later it's supposed to cool off and snow again. Go figure, weather can be so strange here, nothing seems to phase us anymore. Just keep calm and drive safe. That's really all you can do.

And for those of my friends who have packed up and moved south, we miss you! I know you miss weeks like this! :) j/k. Lake Effect snow misses you! Alright, now I'm ready for a cup of tea. That and I'm getting ready to try out some new soup recipes this week. Wish me luck! Stay warm and remember to listen to the Pat Sloan radio show tomorrow where I'll be chatting about my new book, Seamingly Scrappy! I hope I don't sound like a dork!


1.26.2013

Cold Jaunt to Pittsburgh

Earlier this week Mom and I packed up the van to the gills with all sorts of goodies and headed to Pittsburgh. I love being able to travel like this, but some little ones in my house didn't like it so much:
I hardly have the opportunity to get pictures of the both of them in one shot, I didn't think this one was too bad. 
 Last weekend Duncan got groomed and they always do such a good job. He even wears the scarf for a few days until it eventually falls off.
We noticed once he came back from the groomers how gray he's getting around his eyes. My little senior dog! I LOVE this picture. He's such a Momma's boy and to be honest, the only way I got this many pictures of him this well was I was holding his new favorite toy hostage... But it worked!

But alas, Mom and I packed up and headed to Pittsburgh on Monday. We were speaking at a local guild that night giving a small trunk show of my patterns and the Judy Niemeyer patterns Mom is carrying at her shop (Cottonpickers Quilt Shop in Chardon, OH). We made a small stop at Ikea on the way... WHY HAVE I NEVER BEEN THERE BEFORE???

Many people have told me Ikea is nice. No one ever said until recently that I needed to go. If I knew what I know now I would have made out like a bandit when we bought our house... But now I know and Ben is in sooooo much trouble. We may have to go back very very soon!

But back to the program, we visited the East Quilt Company Guild in Pittsburgh with about 100 members. The day we came was the first of a major cold snap in the area, with temperatures in single digits, but the attendance to the meeting was still good!
 Mom went first and showed off the Judy Niemeyer quilts she has been working on.
 I would have gotten more pictures but these ladies meant business and I was helping to hold up quilts, then it was my turn for the trunk show and they shopped with a purpose. Before I knew it we were packing up and getting ready to brave the cold.

The next day we did a workshop with the ladies and with all good intentions I had my camera but the ladies were so intent on sewing their little hearts out that I didn't get the chance to use it at all. Plus it was probably frozen due to the fact it was all of 6 degrees outside! It's been really cold all week, yesterday was the warmest I think and the highest I saw the temp. rise was about 16 degrees. A tad bit chilly!

If you would be interested in a trunk show or a workshop, please e-mail me at rubybluequilts (at) gmail (dot) com. My schedule is fairly open at the moment, but is filling up. I plan on posting a schedule on the blog here in the coming days. Keep in mind I am willing to teach both regular patterns and patterns from my book, Seamingly Scrappy, once it's released in a couple weeks.

Hope you're all staying warm and I'll be back to post pictures of the snow we've been getting up here. I actually had to take a snow day this week because it was snowing so hard I wasn't sure I could get up the drive to get to the long-arm or not. Tis' the season I guess. Toodles!


1.24.2013

Chatting with Pat Sloan!!!

Visit the American Patchwork & Quilting Radio podcast next Monday, the 28th, at 4 p.m. EST and you'll hear me (and possibly my dogs in the background) chatting with Pat Sloan!
We will be chatting about the release of Seamingly Scrappy as well as other happenings here in Ruby Land!

I'm sooooo excited! Also, if you can't listen to the show as it's happening, you can always listen to the podcast by visiting the American Patchwork & Quilting Radio site.

1.23.2013

Visit Your Local Quilt Shop Day!

Tomorrow, January 24th, is Visit Your Local Quilt Shop Day!

Take a pause in your day if you can to visit your Local Quilt Shop and let them know just how much you appreciate them!

Also, if you haven't had the chance yet, there is a photo contest going on OVER HERE where you can enter for a chance to win all sorts of wonderful prizes including a $500 shopping spree at any local independently owned quilt shop and a Project Runway sewing machine from Brother as a grand prize.

For more information, you can visit http://www.quiltshopday.com/

For photos of many other authors, designers, and just general quilty people like mine above, visit http://www.quiltshopday.com/2013/01/23/celebrities-support-local-quilt-shop-day/

Side Note - this picture was actually taken in my Local Quilt Shop! Thanks, Mom!

(yes, I may love my LQS a little more than most because that's where I got my start in quilting and my Momma owns the place, but alas, please support your LQS and everything that they do for quilters and their communities)

1.20.2013

Mini Stars Tablerunner

So you've seen some of the masterpieces that I've been privileged to quilt lately that have been designed by Judy Niemeyer. I know some of the quilts (especially with the extensions) can seem overwhelming and beyond your skill level, but I'm here to tell you they aren't!

Judy has an engineering background and has thought through every step of the process so there's no guess work for you to do besides pick your colors. In the old days paper piecing meant making copies that could be unreliable and holding your paper and fabric to a light source while crossing your fingers hoping the fabric was big enough... Not with Judy's method.

Judy gives you every piece to cut out with your rotary cutter (with plenty of extra) that you'll need for each exact piece. She tells you which side you'll be sewing on and gives you all of the information. Is it a little more time consuming? Yes. Is it worth the effort? Super Yes. With the wedding ring quilt I'm currently making I can guarantee you it might have been faster to use an alternate method, but all of the errors and fudging I would have had to do would have taken away all that time I "saved" and I probably wouldn't have been happy with the end result... Not what I plan.

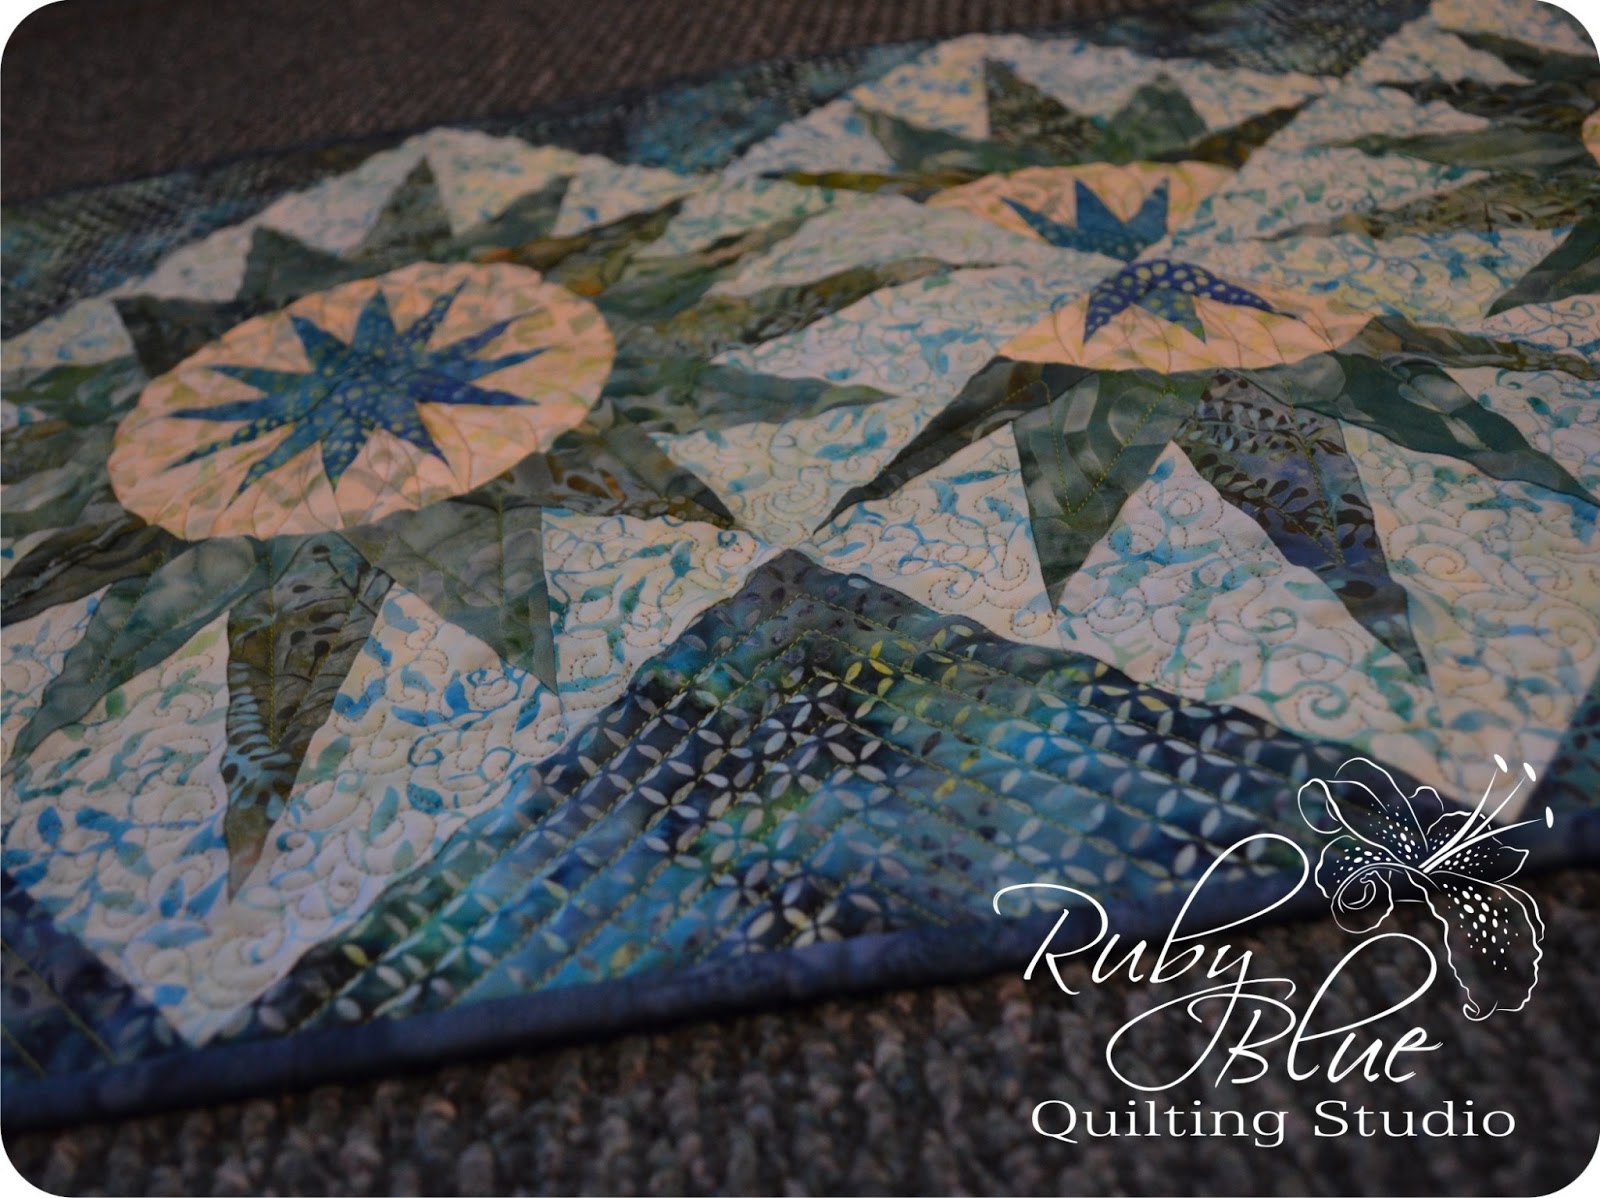
So why am I babbling about all of this? Judy also makes simple projects for you to "get your feet wet" and try out her technique without the stigma of the more complicated patterns, like the Mini Stars Tablerunner:
 Lemoyne Stars in different sizes. That's it! Traditionally this block is made with marking and Y-seams and other terms that make quilters run in the other direction. With Judy's method you'll learn the fold-cut-sew technique she uses and get perfect points in the process. What could be better?
 My Mom made this as a sample for her quilt shop and I quilted it earlier this week. I used a few different threads and the background thread blended in so well it's hard to see the stitching, but I swear it's there!
I'll admit I'm not the biggest fan of actually quilting line dancing quilting, but I've seen pictures of it lately doubled up and these larger stars were the perfect canvas for me to test it out. 
 In the smaller stars I did just single line dancing as there wasn't much room left for anything more.
 Simple quilting for a simple pattern. I love how you can see the design on the back when the lighting is just right.
 Now when Mom sees these pictures and sees that I put her new tablerunner on the woodpile out back to get pictures she might freak out a bit, but it was all in the conquest for better lighting, I swear! It didn't get dirty. Plus it was only about 28 degrees out at the time, we did a quick photo shoot while the puppies were running around outside.

Mom actually will be teaching this class in the very near future at her shop, Cottonpicker's Quilt Shop, in Chardon, OH. If you live near and would like to sign up for a class, you can check out the class schedule by clicking here. If you really just want the pattern, she can help you with that too. E-mail Beth at CottonpickersQuiltShop (at) gmail (dot) com. If you didn't see before, we are now a certified Judy Niemeyer Quilt Shop which means we have the new Mariner's Compass pattern and are ready to ship it to you! For more on the new pattern, see this post here.

So have you tried paper piecing before? Was it Judy's method or another style? Would you be willing to try a simpler pattern like this?

My first quilt ever was paper pieced the old-fashioned way. It wasn't pretty and that's why it lives unquilted in a ziploc bag in the bottom drawer of the dresser in my sewing room... I may be able to fix the not-so-nice pieces and one day finish it, but that project is at the bottom of my to-do list right now. If I had learned this method first, I probably would have been more into quilting from the beginning.

Well, this little beauty I showed you today as well as a bunch of quilts will be traveling to Pittsburgh these next couple days with Mom and I as we spend some time with a local guild. I'll be sure to take pictures and report back when I get home! Toodles!

1.18.2013

Glacier Star Recap

 All the same quilt pattern...
 Just different fabrics and placement...
Would you believe they're all the same pattern if I hadn't told you?

Just goes to prove how powerful color can be. And imagination...

So what colors would you choose if you made this quilt? Are there any of the small color placement details you like better in one quilt above more than the other two?

There are soooo many small differences from one area to the next on these quilts that makes them unique. What do you notice the most? I'd really like to hear your thoughts on these quilts.


1.17.2013

Cactus Flower Table Runner

Mom and I have been working diligently on making all sorts of samples of the Judy Niemeyer patterns we carry at the shop. I'm still working on my Bali Wedding Star, but it's not my main focus at the moment so progress has been slow, but I did manage to finish up this beauty:
 This is one of the kits we made at Cottonpickers for the Cactus Flower pattern. Mom is working on the other one and as soon as we get it finished I'll show it to you too. When we chose these fabrics, we knew we wanted to make a kit or two and I took one look at the batiks on the shelf and four of these fabrics were sitting right next to each other begging to be used.
There are actually three different fabrics in the spokes of the sunburst, but they are so gradual it doesn't show immediately. I think they show more on Mom's version (it's burgundy and green and tan = awesome). 
 I quilted this with two different colors of green. I used a fine light green thread for the lighter fabrics and a lime green that I love for the spokes and the setting triangles.
 I used the same lime green for the back and it works so well with this cyan Bella Solid. It really shows the quilting and gives it just a bit of flare that it would not have had if I used a matching thread.
 Hardly at all do I mismatch the thread, but this combo works so well together I had to. Plus this design is so playful it can handle it.

Yay! I finished something and it's bound and everything! I hate to say that hasn't been happening much in the past few months, but I'm really trying to focus on reorganizing me and my time. It's not been easy so far, but I'm really trying to put balance into this crazy life I'm in. Hope to show more finished projects here in the future. Come back tomorrow for a recap of the Glacier Star quilts I've shown you, it'll be exciting!

1.16.2013

Machine Quilting: Glacier Star #3

This is it! The lastest Glacier Star! Notice anything different with this one?
Yes. You see it right. This quilt was made with all Civil War Reproduction fabrics! Isn't it gorgeous?!
I think one of the neatest things Paulette did with this quilt was to alter the fabrics within the sunbursts on her extensions. It gives this part of the quilt some added charm. 

After quilting the other two Glacier Stars, I really had to reinvent myself with this quilt. Partially due to the fact that the fabrics are so much different than the other two quilts too. So, with the traditional style fabrics, I opted for traditional styled quilting like the feathers you'll see in many places. This type of quilting just would not have worked with the other quilts at all. 
 The true focus of this quilt (no matter which fabrics it is made out of) is the center. I looked through 1800's style quilting designs and altered this particular one to use around the snowflakes. Then keeping with the period theme, I quilted a dahlia-like design radiating out from the center using the feathered design in the center as the guide. You can see the top half of the dahlia quilted in this picture above.
I just love how it turned out. Sooooo happy with this design. 
 Here's a view of how the center and the colors Paulette chose work so well with the rest of the quilt.
 Once again I used feathers for the sunburst blocks between the star points with just a little non-traditional quilting to fill the background. This definitely would not have worked at all on the other quilts I already showed you. With all of the small points to fill in a design like this you have to get creative...
Different than the other quilts too, I quilted this design in the flying geese and left the "sky" alone on this quilt to leave a nice definition of quilting from area to area. You really can't see it due to the fabrics, but there are two types of swirls quilted in both the black and red fabrics on either side of the geese trail.
And here is the quilt all finished in it's grand glory. Paulette is a relatively new quilter and she did an amazing job with this quilt, don't you think?! As with many of the other quilts I've shown you, this quilt will also be on display at the Lake Farmparks Quilts 2013 Show next month.

Thanks, Paulette! This quilt was such a gem and I'm so glad you had me quilt it for you!

I'm going to be back with a recap of the three Glacier Star quilts I have shown you just so you can see as I have how changing the fabrics, colors, and placement totally changes the look of these quilts. Oh, and maybe  something I actually was able to finish up! Toodles!

1.15.2013

Taste of Summer Salad Recipe


The Hubbin and I started grilling salads last summer and I immediately fell in love with them. Here's the reason - you know how salads that other people make taste sooo much better than any one you ever could? Kinda the same thing with sandwiches, take the same ingredients and end up with polar opposite results... Well, this salad is one I am happy to make any day and it tastes so much better than those super fatty salads at restaurants.

Now don't get me wrong, I still love me a regular old salad. From time to time I just want a little something extra. I figured out a way to get that taste of summer in this salad without freezing my tush off standing at the grill in the winter (if I can even get to it). It's not 100% the same, but it'll do.

Plus you'll find with this salad it packs so much flavor that all of those fatty extras like dressings and cheese and the like will be at a minimum, you just won't need the extra flavor.

So here's what you'll need:

* Hearts of Romaine Lettuce (we usually use one head per person)
* Cooking Spray or Olive Oil
* Any other salad fixin's you like

To get started, wash your lettuce and let it drain in your dish strainer. Preheat the oven to around 400 degrees.

(Note - I say around 400 because it's not an exact science with this recipe, if you're already cooking something else within the 375-425 temperature zone, go ahead and throw this in too. No need to adjust the temperature)

Once the oven is to temp, your lettuce should be well drained. Don't worry about getting every little last drop of water out of it, it'll help during the cooking process.
 Spray a pan lightly with cooking spray. Cut each head of lettuce in half lengthwise and place cut side up on the pan. Spray the lettuce lightly with cooking spray. (Or you can use olive oil and brush the lettuce, whatever method you prefer works here)

(Note - you can grill the lettuce too if you can get to your grill and it's not under feet of snow. If you grill the lettuce, place the lettuce on the grill cut side down first)
 Cook the lettuce in the oven for about 8 minutes (grill for about 2-3 minutes per side getting grill marks on about 3 sides). Once you pull the lettuce out let it cool for a few minutes so it's easy to handle.

Once cooled enough to touch, start cutting the lettuce starting at the tip and working to the base of the plant making cuts every inch or so.

As you cut you'll notice the tips of the lettuce should be nice and crispy while other areas are left untouched and crunchy while other areas have steamed and wilted slightly. Yummo! You get so many new flavors and textures just with a little heat.

Toss your salad with any other fixin's you like, I added just some tomatoes and cheese to mine for a quick side dish. As I mentioned before the lettuce will have so much flavor you may not need to use much dressing if any at all. A light vinaigrette is what I like best (or just a splash of really good ranch dressing and a splash of red wine vinegar, it's awesome!)
 And there you have it! It's complex but simple. It's yummy and nutritious. You could also grill/cook the tomatoes and other veggies to add to the salad.
Have you ever tried a salad like this before? I swear if you try this it'll be a new favorite in your house too!
Related Posts Plugin for WordPress, Blogger...