Now that you all know how to make a binding, how about we pick up where we left off and attach that binding to a quilt?
First things first, you need to make sure that the corners are square on your project. It's easy to find this out by laying a large ruler (mine is 12.5" square) at each corner. You want these as square as possible, because this is one of the "tell-tale" areas that if it's off, everyone will notice.
So line it up in each corner (if you don't have a large square ruler, use the longest one you have or use 2 rulers - one running along each side of the corner). Oh, and nevermind the tape on my ruler, that's for another tutorial down the line :) So, if you're not square just mark lightly where you will be and use those marks as a guide for the "edge" of your quilt.
So once you're square, grab that prepared binding (angle cut side first) and place the cut somewhere along the middle of one side (I usually like to choose a long side first) Align the raw edge of the binding with the edge of the quilt.
You will want to start stitching at least 6" from the end of the binding leaving a tail (this will help when you join the binding pieces later)
Start stitching and backstitch a little (or use a locking stitch if your machine offers it. You're not exactly going to be "easy" on these pieces during this process and you don't want any of those stitches ripping out accidentally)
Then keep stitching down the side until you come to a corner.
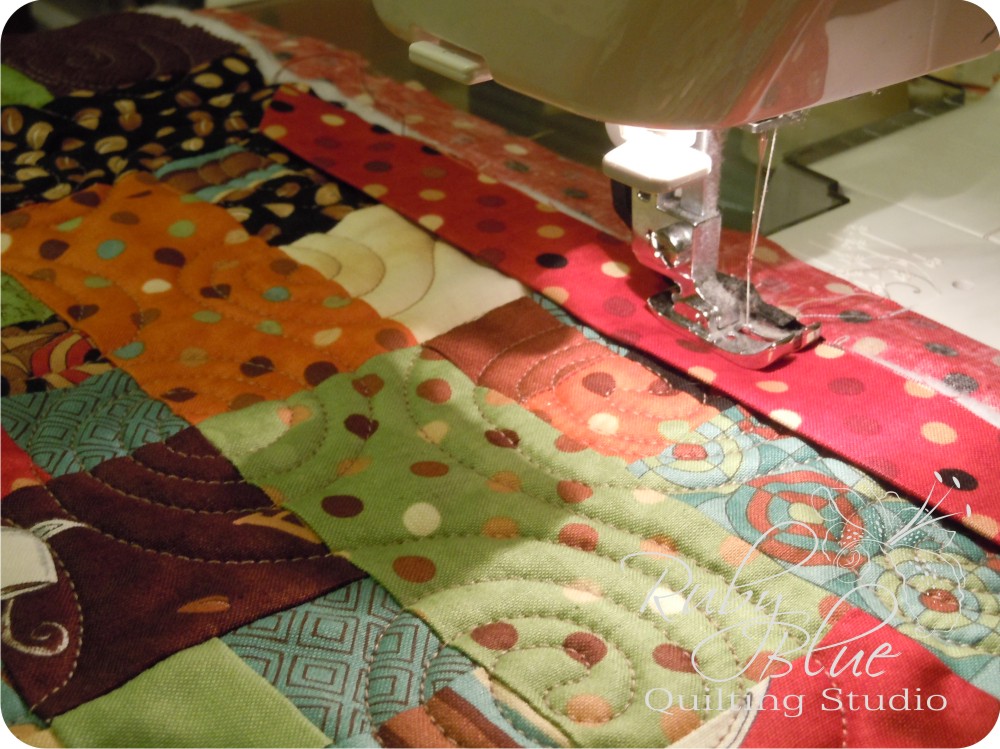
If you look closely at the foot on my machine, it has marks on the left hand side - one for where the needle is and one 1/4" away from the needle. You will want to
stop stitching 1/4" from the edge of the corner. Backstitch for a few stitches to lock in your place.
Now before doing anything else, I start to turn my project so that the side I'm going to be stitching next is in place.
Then I raise my presser foot on the machine. (This eliminates the weight of larger quilts from pulling the stitched end in a direction you didn't intend it on going)
Now take the binding and fold it so it is now going in the
opposite direction of where you will be stitching next.
Holding that folded corner in place, now fold in down aligning both the fold and the raw edge with the corner of the quilt (or the guidelines that you marked)
Start stitching
at the edge of the corner.
Backstitch for a few stitches once again, then continue on completing all four corners and stopping about 12" from where you began stitching.
You will want to give yourself at least 12" of room between the stitching to allow yourself enough "wiggle room" to combine the binding pieces. Backstitch at the end, and then cut your threads and move to your cutting mat.
Open up the most recently sewed end of the binding and pull it taught (taught NOT tight) along the edge of the quilt.
Overlap the beginning of the binding also pulling it taught.
Open up the cut piece and make sure it's all aligned at the edge of the quilt. If you look closely you can see the cut edge just above my fingers.
Lightly mark the cut edge onto the wrong side of the tail end.
We will be using this guide to know where to trim the tail to meet the beginning strip.
To make it accurate, line up your ruler once again with the 45 degree angle on one edge of the binding strip and the side in line with the marking you made.
Continue the marking making one clear line.
Now line up your ruler with the 1/2" mark on the line (you'll want to cut 1/2" away from this mark towards the end of the strip NOT towards the quilt)
Cut the strip at an angle.
Now you're ready to meet the two ends together. Pair them right sides together making sure there aren't any twists in the strips.
I'm going to let you in on a secret - when pairing up angle cuts, you'll want them to intersect 1/4" from the cut edge. You'll see more of what I mean in the next steps, promise.
Line up the two pieces with the overhang even on both sides and pin. Yes, I use 3 pins in this little seam. It's a little weird and I like to be extra sure my seam is where I want it.
You may have to scrunch the quilt up to get these strips to lay perfectly so you can stitch them together.
You can see here a little better of what I meant earlier. You will want the angles to intersect right where your 1/4" seam will be. You want to be able to start and stop the stitching right in those intersections. This will make the two pieces line up into one continuous strip perfectly.
Don't worry about trimming the "dog ears", just finger press the seam open and it should almost instantly want to lay flat and even along the edge of your quilt.
Just like this.
Continue stitching slightly above where you ended, backstitching first and continue just past where you started stitching backstitching at the end. There shouldn't be any puckers, if there are, NO BIGGIE, this is how you will learn, just remember that on the next one and adjust how taught you pulled the strips together when you marked them.
So once finished stitching it should look like this.
Oh and for those of you who read my
Back to Basics - Scissors, I just got my spring-loaded scissors and they are perfect for the next task!
Trim along each edge RIGHT AGAINST the edge of the binding. It may help to trim the shorter sides first getting rid of some of the excess backing and batting (it will make the long sides longer if you have to trim it off of those)
Trim all four sides and pat yourself on the back. You're almost ready to stitch the binding down now.
I know this may seem like a TON of steps, but honestly once you get used to the steps, you will breeze right through them all. Putting this binding on including taking pictures at each step took me about 15 minutes, maybe. It goes quickly, and you will speed up with the more you do!
So once again, I'm curious, do you attach your bindings the same? Do you do it differently? Do you have any questions? If so please leave a comment below.
As with making the binding, I please ask that if you have anything to comment (both questions and comments) that you please leave a comment below and I will answer back in another comment. (that's a LOT of the word comment, sorry) This hopefully will leave this as an open discussion because you might have the same question as someone else. I will answer them all here so everyone can read my answers.
Come back tomorrow for the final step, stitching the binding down! See you then!


great tips! I find using my walking foot to sew on the binding very helpful too. I'm happy to find someone else who does the trimming AFTER sewing on the binding!
ReplyDeleteA walking foot does help, but if you don't have one, a normal 1/4" foot is fine. Good point Ellyn!
DeleteI always trim first, but I think I'm going to change that!
ReplyDeleteIf you trim first, it may not be square as well as there is the chance that if you trim through quilting, it could weaken the quilting. Some stitches might even start to unravel if you trim ahead of time. You might need to trim some excess, but always leave at least an inch around the edge until AFTER the binding is sewn on. Then trim. Good comments so far!
ReplyDeleteI use my walking foot too. It just seems to help move the bulky layers through evenly. Having said that, I thought your using the 1/4" foot with the markings seemed very handy. I use a binding gadget from Fons and Porter to figure out the angled ends. I thank you for showing your method on this. I think I will give this a try on my next binding.
ReplyDeleteThank you for showing so well how binding is joined. I have marked this tutorial and will surely use it step by step. I have struggle with this aspect when finishing a quilt. Thank you for the time and effort it took for you to photo and explain!
ReplyDeleteDonna