Showing posts with label Plus Quilt. Show all posts

8.01.2015

Scrap Quilt Challenge

Today I have some exciting information for you about a Scrap Quilt Challenge you can join and use up some of those scraps in your stash! This is an exciting group of creative ladies that you can find by visiting the main Challenge page here:  http://www.fabricsnquilts.com/scrapquiltchallenge/ or you can read more about the challenge on their blog here: http://fabricsnquilts.blogspot.com/2015/07/join-us-for-scrap-quilt-challenge-5.html.

Basically all you have to do is create a scrappy quilt within the last year and post the picture to a Flickr group by October 15th! You can see the Flickr group here:  www.flickr.com/groups/scrap-quilt-challenge-5/ and don't forget to use hashtag #SQC5 when posting to Instagram (if you'd like to show off your scrappy creation there too!)

Now, there are minimum requirements and some teeny tiny rules to follow, but I know you all can handle those. Please find them at the links above for the main Challenge information. Oh, and did I mention there were prizes to win?

So, without further ado, my job today is to give you all a scrappy fun block that you could make and turn into a quilt you could enter into this challenge. Now, I didn't get a chance to sew mine up, I sprained my ankle earlier this week and it's my "driving" foot so I'm trying to give it a rest, but I can share with you how to make this none the less.

Plus, I have a great idea to make a bunch of baby quilts using this block and it gives me time to figure out what colors and themes to plan for!
 I came up with this fun scrappy plus type block that finishes at 10" (honestly it's bigger than I usually like to work with, but to get the most scrappy pieces I could, this was the right size)
 So basically, the block is a fun plus in the middle that you'd want to make bold and exciting. Then use a more subtle but coordinating print to frame the plus in the block and surround it all with scrappy HSTs. I would keep the HSTs more subtle too, but there's room to play and be creative!

First you're going to make the 8 HST units. Use whatever technique you'd like (there are several) but if you need a tutorial on how I like to make them, you can view that here. Use the 4 background 3.5" squares and the 4 HST 3.5" squares you picked out. Each HST unit should measure 2.5" when complete.
 Now we're going to construct this block in sections. First take the HSTs and some 2.5" background squares to make the corner sections. Press the seam allowances as shown.
 To make the plus, create two ends and the center as shown above. Remember to use all the same coordinating fabrics in these pieces.

Also, follow the pressing instructions I provided and you should have an easy time constructing this block. All of the seams should "nest" well together.
 Construct the block using the sections laid out as shown. Play close attention to the direction of the corner sections as you lay out the block.

And there you have it, a block that should measure 10.5" once constructed (10" finished).

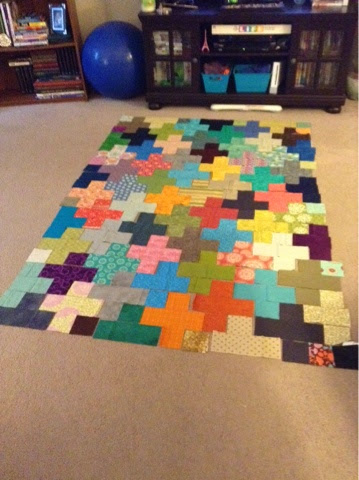
I came up with a few different layouts for this block and they each create a different secondary pattern. The first layout is just the blocks sewn to each other.
 Next I added in some sashing but to keep the scrappy look a little more toned down, I used the same 2.5" cornerstone each time. For this sashing you would need to cut 2.5" x 10.5" strips.
 And to change it up just a bit more (if you're a super scrappy enthusiast) you can make each of the cornerstones a different 2.5" square and it would give the quilt a whole different look.
With the sashing, rather than a secondary diamond, you create a shoo-fly instead. There's no right or wrong with this block, but almost too many options to pick from.

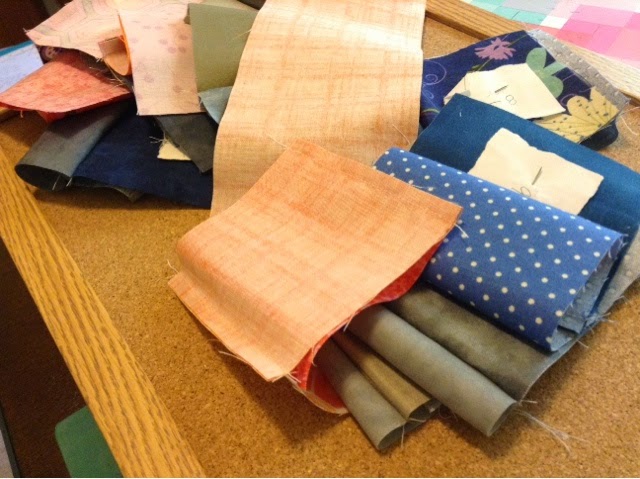
I just can't get enough of the plus blocks around at the moment and I thought this would be a really neat scrappy version to make.

Well, that's my little tutorial, I hope you like the block and I hope you get to participate in the Scrap Quilt Challenge. You're probably making scrappy quilts already and taking pictures, so why not upload a picture, share what you've done and possibly win some prizes while you're at it? And if you just need that swift kick in the rear to get inspired and bust into your stash, the inspiration you'll find on the Flickr page may just be the ticket to get you going!

Thanks for dropping by and have fun quilting scrappy!

10.30.2014

Trying something new

I am entering the Blogger's Quilt Festival for the first time! I'm super excited and you should join too! For more information about the festival, visit Amy's page here for all of the details you'll need to either enter, get inspired, or vote for your favorites (voting starts this weekend!)
 When I started thinking about entering the Blogger's Quilt Festival this year, I was in the midst of working on this quilt. Little did I know at the time it would soon become one of my favorite quilts ever and so much more than I ever imagined!
 It's hard to believe, but this is how it started. I cut up a bunch of pieces from my stash and added in a few colors here or there to get a nice mix. I liked it but I wasn't in love. When I paused to grab a drink and was glancing at the quilt, I got this crazy idea to shift the colors within the quilt and fade from one to the next. Keeping 98% of the original fabrics and adding in minimal pieces to blend the colors well, I ended up with this:
 As soon as it started to come together, I knew I was on the right track! Granted there are a few places that I wish the transition was a bit smoother, but it still works well for me.

Also, if you're a regular reader of my blog and you're sick of seeing this quilt, I swear after this it will go away, but I'm still in love, so....eh. If you're new to the blog, welcome and it's good to have you! Alrighty, back to the quilt.

So then it was time to quilt it. I only knew when I got started that I wanted to quilt paisley feathers somewhat down the middle-ish and then have it branch off from there to both sides of the quilt. I was just going to echo around it to fill in the remainder of the quilt... But then I got bored. Quick.

So that's when I started adding in pebbles and alternating the direction of the echo.


When that got boring I added in some traditional feathers and swirls, and why not - I added in some woodgrain. There's so much quilting going on but it works. The colors make your eye move around the quilt and the quilting keeps it interesting as you look.
 So then in a weak moment of insomnia I stayed up waaaaayyyyy too late to create a scrappy binding to match the colors of the quilt... It was the most complex binding I've ever created, but my favorite! Oh, and all of the binding pieces came from my binding stash (in the egg basket to the left of the quilt in the above photo).
And then before you knew it, it was done and quilted and bound and washed and crinkly and I love it. I hope you all enjoy it as much as I do and if you like it enough that you'd like to make your own, I have created a tutorial for the quilt complete with printable instructions, just click here to go to that post.

So, that's my quilt I'm entering into the ROYGBIV category. Even though it's scrappy, I think it fits here the best. I hope you all like it and I can't wait to see what everyone else has entered. Remember to head over to amyscreativeside.com for all of the information on the Blogger's Quilt Festival!

10.28.2014

Mini Scrappy Plus Quilt Tutorial

I know that as excited as many of you were for the larger Plus Quilt Tutorial, you were super excited for the arrival of the Mini Plus Quilt and here it is!
 This quilt was completely made by accident or by resorting to quiet work during insomnia really... I had a bunch of leftover pieces in varying lengths from another project. There were several solids that I knew coordinated since I used them in another project and all of the strips were 1 1/2" wide. So what's a girl to do at 4 in the morning when everyone else is sleeping (even the dog)? I redid the math for the Plus Quilt and made it square rather than rectangular and within an hour or so I had it all cut out, laid out, and ready to go!
 I quilted this up a few weeks ago with just some straight lines using my walking foot for the first true time and it went so fast. I literally quilted this while my Hubbin was getting ready, that's it! Why did I not try this sooner?! Alas, then I got it bound and then we had no sun for weeks (or we had it when I wasn't home) and without it I just couldn't get good pictures of the colors. But here it is hanging in my sewing room:
Yep, there's another mini I made that I still have to share and the Mustang I stare at every time I sew. If you haven't heard the story, my Hubbin loves Mustangs and wants one something fierce. Well, he got this die cast model for Christmas one year and promptly placed it in my sewing room so while I'm quilting and writing books I know what to strive for with all of my hard work ;) It started out as a joke, but the Mustang model is still there years later and I don't think it's moving any time soon!

Well, as with the larger version of this quilt, I've created a printable pdf file you can get to by clicking here that will tell you all of the details of this quilt. Remember, both quilts were designed to be scrappy so the directions tell you how many pieces to cut, not how much yardage you'll need. Especially with this little mini, you can easily get the pieces you need out of scraps without a lot of fuss.

Which reminds me, I rearranged my stash again (it will always be a work in progress) and I want to show you what I've done. It's working out quite well and I'm thinking I may need to dive into my scrap stash later this week... We shall see.

And as always, if you create one of these Scrappy Plus Quilts using either tutorial, please send me pictures!!! I'd love to see what you've done. And remember you can always find me at my email at rubybluequilts (at) gmail (dot) com or you can find me on Pinterest, Instagram, or Facebook at rubybluequilts!

Right now I'm finishing up my coffee, gonna eat some breakfast and see if it's warm enough to paint. I need to get a few things painted and I think today is the last chance I'll have to get it done. This weekend they are calling for icky wet snow already. Trick or Treating for Halloween is Friday night and it doesn't sound like the weather is going to be great... Hope you all have a great day and enjoy these tutorials! I have a few more in the works to share in the near future... Talk to you all soon!


10.25.2014

#notgoingtomarket post...

I have to say, I feel a tad bummed about not being at Market right now, but being able to see all of the updates and have a #virtualmarket with all the other quilters that are home has been nice. I kicked off my weekend with a trip to some local quilt shops to gather the last few bits of materials needed for some upcoming projects and now I can cut until my arm wants to falls off!
(I wanted to share a picture of my loot from my trip, but I tore into it like a Tasmanian Devil and it's all sorted into projects that I can't show..... So here's a picture of Paco) :)

I had so many projects that were almost ready to be cut, this one needed an accent fabric, this one needed a few more of this... Now I'm set and ready to go. I may need to find a movie or 6 to watch to keep me company, but I'm hoping I can cut a bunch and then sew when I can from time to time during the next few weeks or so.

Other than that, it's been kinda quiet around here, but that's quite alright with me! I finally was able to get some decent pictures of the Mini Plus Quilt so I will work on the details of that pdf and get that tutorial posted probably during the beginning of the week.

By the way, I hope you all are enjoying the Plus Quilt tutorial I posted earlier and I hope you like the printable pdf option. Once I worked out the bugs (hopefully before anyone got to it) and learned what the heck I was doing, I think you all have been able to access it okay. I haven't heard otherwise and I wanted to thank you all for the wonderful comments about the quilt. This quilt is currently right next to me on the back of the couch all washed up and crinkly and waiting to be used. So far I've just admired it, but I'm thinking tonight if I can use it without having to share it with the dog, tonight might be the night!

Aside from all that, I'm still waking up and drinking coffee so I apologize if I'm rambling. I tried a new allergy pill and I am pretty sure it's worthless so that is adding to the morning mental fog. Sorry. I'm going to go finish my coffee, head to the post office, and then cut into these lovely fabrics I got! My only problem now is which project to work on first! I want to do them all right this second!!! I know it's not going to happen, but a girl can dream!

What are you working on this weekend if you're #notgoingtomarket? Share it with me here or you can find me on Facebook or Instagram (rubybluequilts on both)!!!

10.21.2014

Scrappy Plus Quilt Tutorial

Sorry for the delay on this one, but here it is and I'm super excited about it. This quilt was a blast to quilt and was soooo much fun to plan and play with, it came out even better than I could have imagined!
 Now if you remember, this wasn't the original layout. Originally it looked more like this:

It was okay... but I wasn't sold. Then I got this crazy idea to fade the colors and it just clicked. I had to cut out a few more pieces to make the fabrics work well (especially around the edges) but it was soooo worth it.

Also, I have a mini version that is complete and quilted and bound, but I just need a good sunny day to take pictures. And well, it's Fall in Ohio and once I finished the quilt and hung it on the wall in my sewing room, no sun when I'm at home, at all. Just dreary rainy days and darkness. So stay tuned for another tutorial for the mini coming up soon too.
I made this quilt super scrappy and used a different fabric for EACH plus and I wouldn't have it any other way. So with that in mind, the printable pdf (below) has instructions on how many of each shape to cut, NOT yardage requirements.

If that scares you, don't fret. This would work great with fat quarters you have set aside or it would be an awesome opportunity for a swap with friends. Either way you decide to tackle this quilt, just remember to have fun! It took me longer to lay out this quilt than it did to sew it together, and if you're super crazy like me, you can add in a scrappy binding too. I stayed up waaaayyyyy too late working on the binding, but it's perfect.

Here is the link to the printable pdf file, just click here. Now, this is my first time using a printable pdf file, so I'm crossing my fingers and hope it works, let me know if it doesn't...

Alas, in the printable pdf, you'll find cutting instructions and tips on how to lay out the top and stay organized. As always, if you make this quilt, please take a picture and share it with me. You can always e-mail me at rubybluequilts (at) gmail (dot) com or find me on Instagram at rubybluequilts.

I can't wait to see what you create and I will hopefully be able to post the mini tutorial soon!

10.07.2014

Tidbits

I have gotten so much done, but yet have so much to do before I can share it! How rude of myself! 

Well first things first, I quilted up a couple minis this weekend including this adorable number:
I quilted this while my hubby was in the shower, that's it. I finished it just as he was finished. Why didn't I play with my walking foot more in the past?! So, since that was so much fun I quilted this mini when we got done running errands:
I can't show the front yet, but I had so much fun and stayed up way too late binding them both. 

I will have tutorials for both plus quilts soon, but I think I've officially come down with quilters elbow, so I'm pacing myself with sewing and clicking the mouse and all things that affect it. Just too much sewing and binding lately I guess. But also I want to link to printable PDF files for each tutorial which is something new for me and I want to do it right, so give me some time to figure it out and get pictures whenever it decides to quit raining here and I'll be back in the swing of things!

Alrighty, gotta go quilt before my elbow screams at me, wish me luck!

10.03.2014

Late night sewing

So if you've been wandering around on Instagram, you've seen this project in progress... It's almost finished, but I couldn't wait until the binding was finished to show you!
This quilt has turned into so much more than I could have anticipated and I LOVE IT!!! 

So like the crazy person I am, I stayed up way too late, dug into my binding stash (yes I have a binding stash) and pulled out random little bits to make a coordinated scrappy binding to match the quilt top! It only needed a couple minor tweaks and it's perfect. 

There's only one transition I'm not too fond of, but I didn't have that much purple-ish bindings to choose from, so whatever. I still love it. 

If the weather turns ick like they're calling for it to do today, I may quit early and come home and stitch down binding Iike a boss. I'm pondering which threads to use or if I just need to switch colors every so often. 

In the meantime you can check out the other photos of this quilt's progress on Instagram, or wait patiently and I will post them here!

Have a great day and I will be back soon!

9.17.2014

Change of plans

I had this great idea yesterday to download all of my pictures off of my camera and write some witty blog post... Well, that all got derailed when I got a frantic text from my BFF that her dog was missing. They had gone door to door and were planning to put up flyers so I went to the park behind her house and walked the paths looking for Bridgette, the dog. 

I turned up nothing and her hubby went looking out back in the woods again, but luckily it was all effort well wasted. They now live on a super busy road and Bridgette somehow ended up by the road. A nice dog lady picked her up and took care of her before returning her home yesterday morning. 
 And here she is reunited with her kids. Phew, that could have turned out so differently, but we are very glad she's home. 

With her home safe, I got back to quilting and started on this long overdue project:
This is another version of Woodland a Sunset from Seamingly Scrappy, my first book with Martingale. I was able to quilt everything but the backgrounds. I'm completely stumped. I normally don't unload a quilt half finished, but this one can wait a bit until I figure out the best plan for it. Any ideas? All I can think of right now is pebbling , but my arm wasn't feeling up to tons of pebbles yesterday. 

I also need to piece the back for my plus quilt, I got some other fabrics for another tutorial, oh , I did finish my mini plus too and I need to share that... Lately it seems like there's everything and nothing going on all at once. I've been busy, but I can't share most of it :(

Alas, more good stuff is to come and I'm hoping for a nice boring day today. Have a great day and we will chat again soon!

9.13.2014

Early morning

Right now I'm sitting here listening to the news and smelling my Hubbin's coffee. Thinking I should go get my own cup...

Things have been a little quiet here this week, I've been quilting and binding and fighting an allergy fog. I've wanted to write a blog post all week but I either fell asleep too early or slept in, but once again I'm learning that's okay. 

I used my awesome little calendar to do all of my quilting "work" this week and now I have the weekend to do some more fun sewing. 

I finished the top for my large plus quilt, I'm thinking about using a tanish back for it, but I'm also thinking about fading the back from darker to lighter tans. Thoughts???

I have a few bindings I need to catch up on and I'm thinking Sunday afternoon while watching football will be the perfect time to work on it. Or cut out another quilt... We will see :)

Anyway, I'm going to sew and hopefully have more to share here, I hope you have a great weekend! I'd love to hear what you're working on!

9.08.2014

Sewing Report and Thank You!

First off, thank you all so much for the kind words about our dear Duncan. Ben and I cannot thank you enough for the kindness and support you shared and we will be forever grateful. You guys are the best!

Now, this weekend I did a little sewing. (Yay!) I'm about half way done with my plus quilt and I finished the top I can't show you yet (boo hiss). And because this is such a sickness and I just can't stop, I cut out a mini plus quilt from scraps this weekend since I got up at 4:30 and didn't want to disturb the rest of the house:
I did the math, cut it up, laid it out, and got it organized to sew before everyone was up on Saturday. Oh, and don't worry, I'll be sharing a tutorial for this too once I get it done. I've officially caught the mini quit bug. Oh, and then once Ben got up I printed off a new paper pieced design to use up some scraps. 

Then Sunday while watching the football games, I wanted to continue to sew because I'm about half done with the rows for my plus quilt:
And I really wanted to sew them together, but I wanted to watch football. What's a girl to do?! So like any other obsessed quilter, I started cutting out another quilt. 

So if you're taking a tally, I finished one project, worked on another, and started three more projects this weekend. It's a sickness I swear! Hope you all had a great weekend and thank you again for the kind words. I'll be back soon with another update and hopefully a quilt or two I can show you!

9.03.2014

WIP Report

I had all of these grand plans to quilt like a mad woman over the weekend and yeah... Not so much. 

The Hubby and I took a day and went to the local fair and then it was cleaning and grocery shopping and not fun stuff, followed by a super lazy day and I'm learning that's okay!

I did get some sewing done, just not as much as I was hoping but I can't show you my big progress. It's a secret for now, but I did work a bit on this one:
It's not done yet, but hopefully will be soon. I've been using it as my odds and ends project between other seams. 
So far I'm working on row 4! Only a bunch more to go. When I do work on it, it does go quickly, I feel an all nighter sewing night coming up :)
And this is the rest of the stack waiting patiently. By the way, thank you all for the quilt love. This one will be fun once it's done and I'm eager to finish (if you couldn't tell). I'm so happy I switched the colors around but I'm already collecting fabrics for  another version. And maybe a mini. But time will tell. 

Happy sewing and hopefully I'll have more to share soon!

8.21.2014

WIP report on Thursday

So yesterday I stayed home to sew, mainly because my car was getting new brakes and it gave me the perfect excuse to sew the day away. 

Earlier this week I started cutting out fabrics for a plus quilt. It's just one of those quilts I've always loved and finally got the urge to make it. 
This is what I started with. I laid it out yesterday morning in a scrappy fashion and it was okay. 
The thing was I liked it but I didn't love it... So in a moment of weakness (or pure genius, you decide) I changed up the layout entirely and shifted the colors from one to the next:
It was a pain to lay out (not gonna lie) and I had to cut up just a few more pieces to fit the open spaces, but I LOVE it!!!

It's gonna take me a bit to sew it together, but once I do, I'm planning on posting a tutorial! I looked online for one and all of the sizes were either too big or too small so I ended up doing my own thing. 

I'm having so much fun I just might make two! I may make the other one more traditionally with maybe all oranges (I have a thing for orange lately, I can't explain). I'm also thinking of going super crazy with a scrappy binding to match the colors going around the quilt... I'm thinking it will make me super bonkers, but after thinking of it, I don't think I can change my mind. 

So that's what I've been working on. Which layout do you prefer, the color shift or the scrappy version?
Related Posts Plugin for WordPress, Blogger...