So far the Hubbin and I have had a wonderful Christmas. We started out at my MIL's for fuzzy jama (pajama) Christmas Eve. It was my nephew's idea since as soon as it was over he could go right to sleep when he got home so Santa could come right away, but all the adults loved it too! The champagne was flowing, the food was excellent, and the array of cookies and cupcakes was awesome as usual!
Our next stop was my parents yesterday morning for Breakfast and Christmas. It was full of fun, laughs, and someone's crazy Chocolate Lab (My Mom's dog Hershey) wanting attention so she'd steal the present boxes and run off with them - it was so funny we couldn't stop laughing to yell at her to stop!
We came home and crashed, Ben's been playing his new Donkey Kong Wii game since then pretty much and I'm still handquilting. I have one last main project I gave myself a deadline to get it done by the end of the year and I'm this close!
I hope you and yours had a wonderful holiday whether it was warm or cold, and may you have a Happy New Year too!

12.26.2010
12.21.2010
7 years ago...
Seven years ago (yesterday), at 1:18 p.m. I was officially Mrs. Benjamin Silbaugh. Looking back it has been a wild and crazy ride, but I wouldn't change a thing! This man changed my life and together we have grown in so many ways.

12.16.2010
Snow Belt in December
I live just outside of the "Snowbelt" in Ohio by a few miles due to the fact I live so close to Lake Erie. The Lake holds this little protective bubble above my house and most of the snow travels about 12 miles south and piles up and up and up. Unfortunately I now work in the "Snowbelt" but I grew up there so I'm used to it.
This is the view I normally would have on a typical day at work (this was taken a few months ago). High visibility, big distances between my desk and that ridge just behind all of those trucks...

And this was the same view from my desk on Monday. All day...

The truly sad part of this all is it's technically not even winter yet. I think photos like the one above are one of the main reasons I quilt. How can you stare at that all day and then have to go out in it and not immediately want to go home and curl up underneath a warm quilt?
I'm not sure what the weather is like where you live, but be safe, stay warm (or cool depending on your weather) and if you have to drive in the "White Stuff" take your time.
I have finally gotten all of my Christmas presents done, I think... (there's always one that I forget about til the last moment) and I'm still working on hand quilting. With Lake Effect, Alberta Clippers, Panhandle Hooks, and any other snow term they keep throwing around on the forecast, I'm planning on staying in as much as possible and just quilting and catching up on the DVR.
Hope you have a wonderful day and I'm off to go shopping for some additions I need for my next Moda Bake Shop project. More on that later!
12.12.2010
Old Fashioned
Christmas decorations are up and out (or as much as I'm going to get to this year) and I thought I'd show you a little of what I did. I love this hat box that doubles as wrapping accessory holder and I have to tell you about my color scheme.
Almost 7 years ago, Ben and I got married just before Christmas. I loved it and wouldn't have done it different looking back. I had already chosen red and gold as my color scheme for the original date we picked (in June) but changed the date to Christmas time and it worked so much better. We had hardly any decorating to do at the church, I had poinsettias in my and my bridesmaid's bouquets, and it was perfect. No matter how much I try, every Christmas decoration I am drawn to will always be red and gold. There's more, but this is the only picture I have so far...

I just love hand quilting! Sometimes it's harder, takes longer, and might not make sense to some people, but it's so relaxing to me. Hubbin is always asking me when I'm hand quilting, "Wouldn't it be faster and easier to do that on your machine?". To answer him yes it might be faster depending on the look I'm going for. Easier, depends on the project. Sometimes if I want to be really accurate and my machine just can't make the sharp turns cleanly, or I have a bunch of starts and stops I will hand quilt it instead.
Hand quilting uses very small needles that are only about an inch long, and I usually use a coated thread. The coating on the thread helps protect it since while quilting it will get much more abuse going through all three layers (top, batting, and backing) over and over again. You can use any thread you like, however if it's not coated, you will need to treat it with either wax or Thread Heaven and use much smaller pieces overall.

I quilt towards myself or to a slight left (but I'm working on sewing in more directions) because I'm right handed and it feels best for me. You can quilt away from yourself, or in any direction. The nice thing about using a hoop is you can move the hoop depending on where you need to stitch so it's more comfortable.
I use two different types of hoops to quilt. In the above picture you can see a resin round hoop. I like this style because it has a locking lip and groove between the two pieces so it holds the quilt better without slipping like some plastics can do. Other round hoops can be found in wood or other materials and it's good to have a variety of sizes. To help with slipping on hoops without a tongue and groove system like mine, there's a new tape out that has grips on it specifically to help keep things where you like it. Other shapes found in these materials are oblong and oval and they also come in different thicknesses.
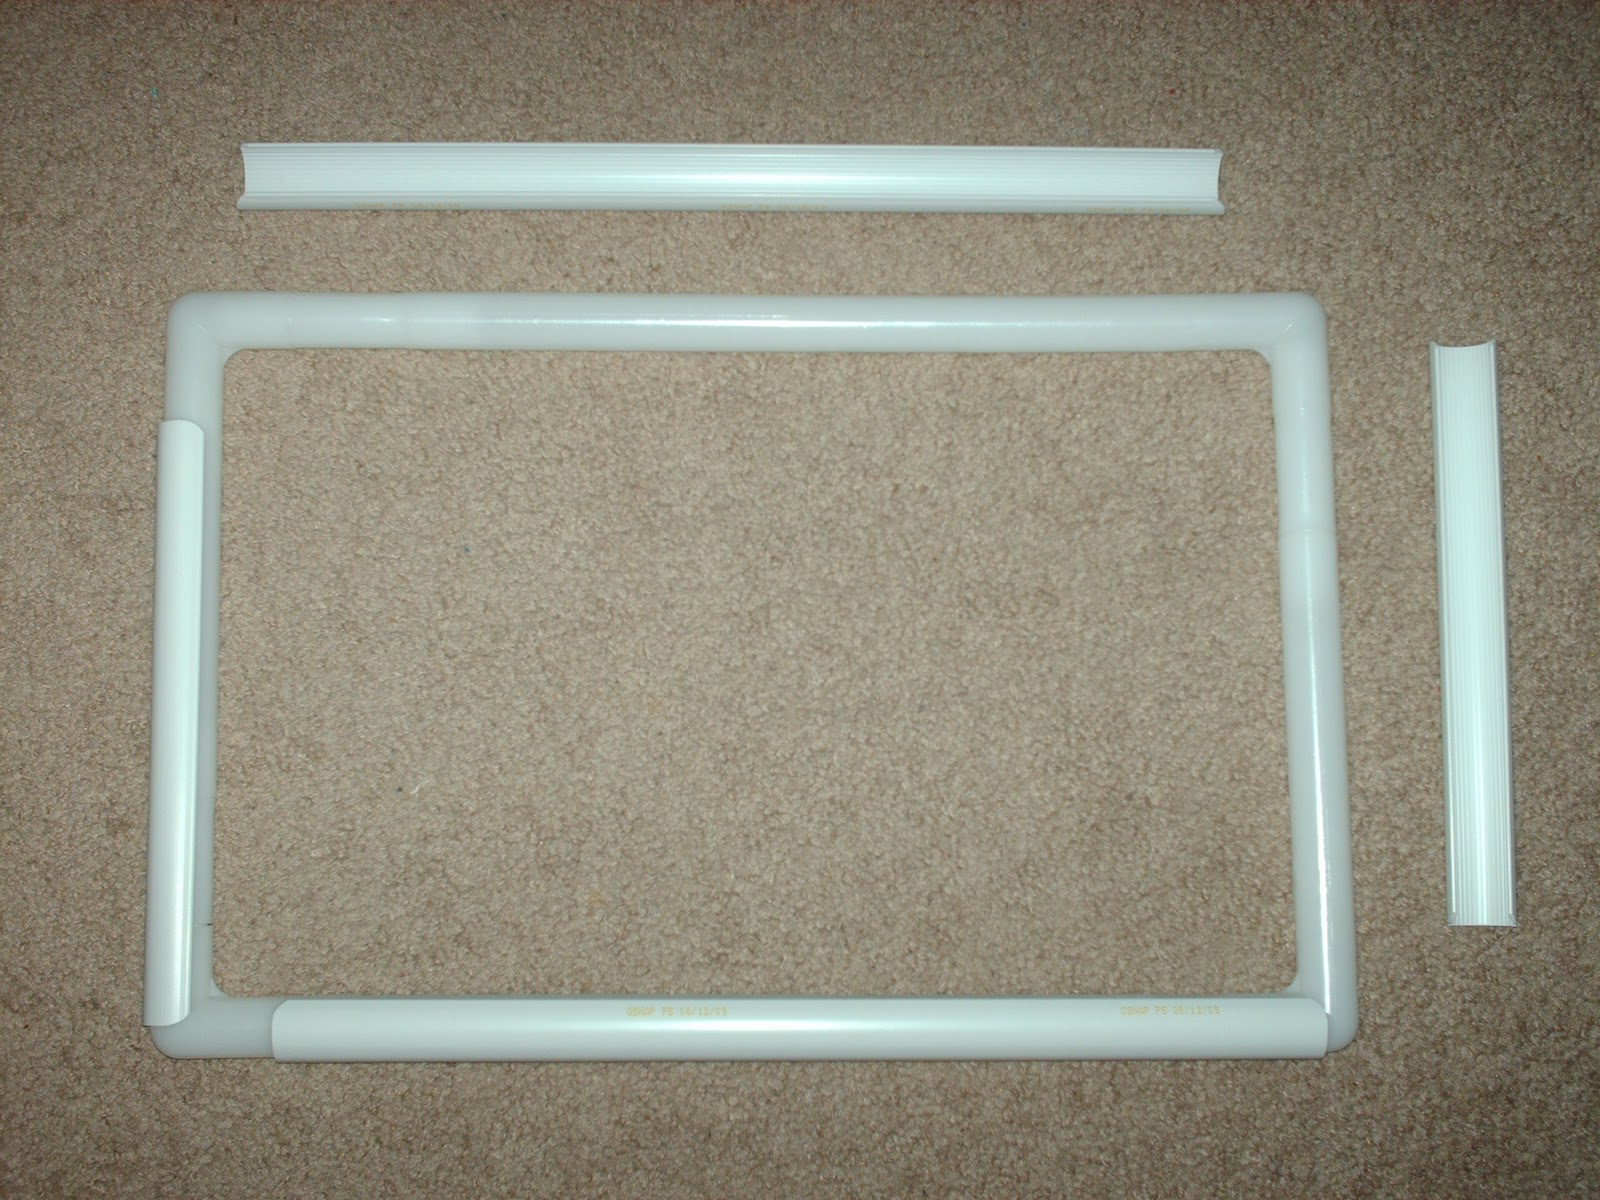
Another style that I just started using recently is a snap frame. This is great for traveling or even embroidery projects as well. There are four parts that make up the rounded frame (like a PVC pipe material) and there are four pieces that snap onto the sides holding your project in place (on the top and side). I also like this for different reasons. One of the most important aspects of hand quilting is to keep your project taught through all the layers, but have enough give while quilting to allow the needle to glide through the quilt. If you have it too tight, your needle will just bounce back at you and you'll be fighting it more than needed. With the way this frame snaps the pieces onto the sides, to change the tension all you have to do is twist the outer piece to either loosen or tighten the layers.
Also it is rectangular so depending on the style of quilting pattern you're using, you can quilt more at one time without having to move the frame. The only thing to watch out with this quilt is with the nature of how the pieces snap together for tension, you are more prone to wrinkles and creases in unwanted areas if you're not careful. But overall, it's a great tool to have.
Another important thing to have is a thimble (or 5)! I prefer rubber thimbles and have a few on hand because or hands change, temperatures change....and with rubber thimbles they're easier to adapt to these changes than a metal one. If you put on your thimble and it's way too tight, throw it in the microwave for a couple seconds and it should loosen up a bit. Otherwise if it's too loose, throw it in the freezer or fridge for a few minutes and it should shrink a tad. You can't do that with metal! And for the right fit, get one that feels just a bit too tight, you'll thank me later. If you get one that fits just perfect now, after a couple hours of quilting your hands will be warmer, it will get warmer and loosen up and might be too loose. But that's also why I recommend getting a few. They will all naturally be different if just slightly.
The quilt above is one I'm working on quilting now, below is From Grammy With Love and it was my first hand quilted "quilt". I found this butterfly border and love the way it turned out. I have since washed this quilt which gives it an extra "crinkly" feel that adds to the 1930's charm of the fabrics. I'm also working on a few other things that I can't show because Christmas is coming and inquiring eyes might be looking...

So to recap, the basics needed for hand quilting are:
* Hand Quilting Needles
* Coated Thread (or thread and wax)
* Thimble (saves your fingers!)
* Quilting Hoop or Frame
* Scissors
There is so much more to it than I can tell you here, but if you get the opportunity, take a class. This is a great technique to learn and it's very cost effective to quilt things on your own. If you have any other questions, please let me know by commenting here or e-mailing me at RubyBlueQuilts at Gmail dot com. Also, sometimes it can add a charm that machine quilting can't give you for period specific quilts. I love it not for just the charm and the savings, but it is so relaxing! This time of year I pop in a movie, sit on the couch, and just quilt away for hours.
12.04.2010
Broccoli Cheese Soup & Snow
There's snow on the ground, more is expected to be here pretty much every day from now until May (okay, I could be exaggerating a tad...) and it's perfect weather to quilt and take a break with a bowl of nice hot soup.
One of my good friends put on Facebook last night: "The weather forecast for Northeast Ohio is expect Lake Effect snow for the next 4 months, have a nice winter!" She doesn't know how true that is! Yesterday we were to expect 1" of accumulation for the day, by 8am it was here and it snowed until about 11am but the sun came out and melted the excess, so all in all we did end up with about 1" on the ground.
Onto the recipe, this is a recipe I found in a cookbook and tried and it was off, so I altered it quite a bit and now I love it. Basically I took the bones of the recipe and added this here, took out this there, and tada!
Here's what you need to make my version of Broccoli Cheese Soup:
Half of a Medium Onion Finely Chopped
1/4 cup butter
1/4 cup flour
1 1/2 cups Chicken Broth
3 cups Milk
3-4 cups Chopped Broccoli (depends on how this you like it)
1 cup Shredded Cheddar Cheese
Crumbled Bacon or Diced Ham or Something (completely optional)
I highly recommend gathering and preparing all of the ingredients before you start, this goes really quick. Oh, did I mention it only takes about 20 minutes to make this soup? You'll want to start by melting the butter in the soup pan.

Once melted, add the diced onion and cook until it's soft and slightly transparent.


And this is the end result, yuuummmmmmyyyyyyy!!!!!!!!!!!
Like I said, it cooks up really quick and with frozen broccoli, and other ingredients I usually have on hand or in the pantry, I can make this pretty much any time and without a lot of notice. Sometimes it's just nice to sit and relax with soup, a piece of bread, and the TV.
I hope you like it and let me know if you have any other ideas for optional add ins. More recipes to come, I promise, for know I've been hand quilting quite a bit, no new projects to speak of. The last month or so of the year I consider time to make Christmas gifts (which are almost all done) and catching up on quilting for the year. Especially hand quilting.
I love to hand quilt, however it is more time consuming and it's not the most ideal in the heat of Summer. That makes days like today with a high in the 20s and a wind chill in the teens the perfect day to sit back, relax, watch some movies (or "listen" to some movies) and quilt! Although the other night I DVRed a special on Cirque de Soliel (I hope I spelled it right!) and was so mesmerized, no quilting was getting done. But now I really want to go see a show or 5, any suggestions on Cirque de Soliel shows you'd recommend?
Alright, time to quilt, I'll show you some pictures soon and we can talk a little further into hand quilting. How's that sound? For now, looking at all of my pictures from cooking has made me hungry, so I'm off to the kitchen. Until next time!
Subscribe to:
Posts (Atom)